BEHIND THE SCENES: A LOOK INTO BIOLOGICAL SAMPLE PREPARATION FOR TEM
Transmission electron microscopy (TEM) is the key technique for investigating cellular ultrastructure at nanometer and even sub-nanometer scale. This exceptional resolving power enables direct visualization of complex cellular components, including organelles such as mitochondria and cytoskeletal elements like microtubules, revealing details at molecular and atomic levels. As a result, TEM remains indispensable for elucidating the fine architecture of cells and advancing our understanding of their functional organization.
But the fine structures images don’t emerge from the microscope by accident. They are the result of a precise sample preparation process, with several critical steps: Fixation, Staining, Dehydration, Infiltration, Polymerization.
After Polymerization, the resin supports the delicate structures inside the specimen, allowing them to be cut into nanometer-thin sections in general between 50-100nm – thinner than the wavelength of visible light.
Fix it Right: Sample Fixation for Electron Microscopy
Chemical fixation is the first and foremost crucial step in the preparation process.
After bringing the sample in the right shape, the preparation process continues with the chemical fixation, typically using a mixture of Formaldehyde and Glutaraldehyde, or Glutaraldehyde alone. These fixatives are cross-linking agents that preserve proteins in their native shape.
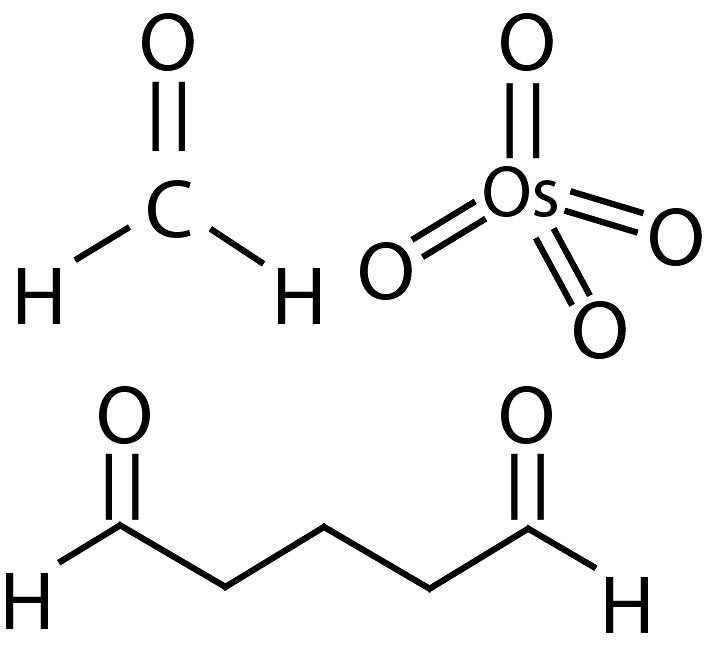
Structural Formulars of Formaldehyde, Glutaraldehyde and Osmium Tetroxide.
This is usually followed by Osmium Tetroxide, a second fixative, which stabilizes lipids and due to its heavy metal character, it further provides the electron density necessary to generate enough contrast in the electron microscope.
To guarantee a decent chemical fixation supporting further preparational steps, buffer selection is crucial for the fixation and staining result. Please see the comparative table for details.
The Importance of Dehydration in EM Sample Preparation
Removing water by Dehydration of biological samples, which can constitute over 80% of a specimen’s mass is necessary to enable infiltration with embedding media and to prevent damage in the microscope’s high-vacuum environment. Typically, fixed samples are passed through a graded series of dehydrating agents, most commonly ethanol or acetone, gradually replacing water with solvents that are mixable with the chosen embedding resin. This process must be carefully controlled to minimize structural distortions such as swelling, shrinkage, or extraction of cellular components, which can otherwise introduce artifacts visible only on the microscope images. Incomplete dehydration can lead to poor infiltration and polymerization of the embedding medium causing difficulties during the sectioning procedure, while excessive exposure to dehydrating agents may cause chemical or mechanical damage to the sample.
Specialized techniques and alternative dehydrants, such as ethylene glycol or freeze-drying, are sometimes used to better preserve native structures, but ethanol and acetone remain the standard for most protocols.
Choosing the Right Sample Mold for TEM Embedding
Depending on your sample, it is important to choose the most suitable mold for embedding to ensure optimal sample orientation, facilitate trimming and sectioning.
Among the most popular choices are BEEM® capsules, single-use plastic molds with a conical tip in various sizes and shapes, ideally prepared for trimming and ultramicrotome sectioning (for epoxy only). Alternatives are gelatin capsules, molds made of silicone, polypropylene, or high-density polyethylene.
Silicone molds offer reusability and flexibility, making them useful for labs processing multiple samples. Their soft structure allows for easy demolding, particularly after resin curing. They are available in upright and flat versions and in a vast number of variations in shape and size.
Flat embedding molds (silicone, polypropylene) are commonly used for simultaneous embedding of several samples and facilitate sample positioning.
Good care must be taken when working with acrylic resins. Acrylics can react with certain embedding molds, particularly those made from low-density polyethylene, like BEEM® capsules. The resins may penetrate and soften polyethylene, causing the molds to distort or collapse during polymerization. Further, polyethylene is oxygen-permeable inhibiting the polymerization of many acrylic resins.
In contrast, molds made from polypropylene, polyvinyl chloride (PVC), silicone, or gelatin do not show these disadvantages and are generally safe for use with acrylic resins.
Regardless of the mold type, best practices include labeling each mold, removing air bubbles via vacuum embedding, and partially pre-polymerizing the resin before sample placement to prevent flotation.
Epoxy vs. Acrylic: A Molecular
Trade-Off
One can choose between two main classes of embedding resins: epoxy and acrylic.
Epoxy resins, like Embed, Araldite, or Spurr, are known for their mechanical strength and excellent sectioning properties. They require heat to polymerize, typically curing at 60°C for several hours up to days depending on sample or block size. Once hardened, they produce robust blocks that have excellent cutting behavior with an ultramicrotome and are more durable for electron beam damage. For researchers focused on fine structural details, epoxy is the recommended choice.
But that stability comes at a cost. High temperature curing and strong cross-linking can destroy antigenic sites, making epoxy resins less than ideal for immuno-gold labelling, where the goal is to tag specific proteins with antibodies and gold particles.
That’s where acrylic resins like LR White and Lowicryls come into play. These resins can polymerize under UV light at low temperatures, preserving antigenicity and even allowing some water content during embedding. They're softer and more hydrophilic, which makes them better suited for detecting enzymes or antibodies post-embedding. However, their relative softness makes them trickier to section cleanly, and they may not provide the same structural integrity as epoxies.
Ultramicrotomy – the final step of Sample Preparation
Ultramicrotomy is a highly specialized technique at the core of transmission electron microscopy. By enabling resin-embedded samples to be cut into ultrathin sections usually in the range of 50-80nm, ultramicrotomy makes it possible for electrons to pass through revealing hidden cellular structures at nanometer resolution.
Achieving this demands precision: section thickness, cutting speed, and even environmental conditions must be finely tuned. And also, the choice of knife is crucial: glass knives are cost-effective for initial trimming and test cutting unknown samples, while diamond knives known for their precision and durability are essential for producing smooth, artifact-free ultrathin sections.
In the end, the clarity and impact of a TEM image don’t just depend on electrons - they begin long before the microscope is ever switched on, in the careful chemistry of sample preparation.
TEM Sample Prep: A brief Step-by-Step Overview
The embedding process follows a predictable pattern:
1. Fixation/Pre-Staining: Cells or tissues are chemically preserved with glutaraldehyde and osmium tetroxide.
2. Dehydration: A graded ethanol or acetone series removes water gradually.
3. Infiltration: The sample is gradually exposed to a resin solvent mixture, increasing the resin concentration step by step.
4. Embedding: The sample is placed in a mold or capsule with fresh resin.
5. Polymerization: The resin is hardened - by heat or UV, depending on the resin type - into a solid block ready for ultrathin sectioning.
6. Ultramicrotomy: The sample block is trimmed and cut into nanometer thin sections.
7. Post-Staining: Sections are eventually stained with Uranyl Acetate, UranyLess often followed by Lead Citrate enhancement.
A selection of fixation buffers:
Comparative Table of Properties of Arcrylic and Epoxy Resins
After bringing the sample in the right shape, the preparation process continues with the chemical fixation, typically using a mixture of Formaldehyde and Glutaraldehyde, or Glutaraldehyde alone. These fixatives are cross-linking agents that preserve proteins in their native shape.
This is usually followed by Osmium Tetroxide, a second fixative, which stabilizes lipids and due to its heavy metal character, it further provides the electron density necessary to generate enough contrast in the electron microscope.
To guarantee a decent chemical fixation supporting further preparational steps, buffer selection is crucial for the fixation and staining result. Please see the comparative table for details.